In this lesson we will learn about the VrButton.
Everything I know about Virtual Reality programming, I learned from Praveen, BocaJS and Google!
The VrButton component is another way to handle events. It works simularly to a traditional button.
<VrButton
  onClickSound={{
   mp3: asset('alien_voice.mp3'),
  }}
  style={{
    transform: [
        {translate: [0, 2, -5]},
        {rotateX: 45},
      ]}}>
To practice using the VrButton, we are going to contine editing the code we started in Event Handeling. Here is where we left off:
import React, { Component } from 'react';

import { AppRegistry, asset, Pano, View, Sphere } from 'react-vr';

export default class Basics extends Component {
  // constructor
  constructor() {
    super();
    this.state = {
        // spaceship radius
        radius: .5
  		};

 }

  render() {
    return (
      <View>
        <Pano source={asset('space-sky.jpg')}></Pano>

          <Sphere
            onEnter={() => this.setState({radius: 1})}
            onExit={() => this.setState({radius: .5})}
            radius={this.state.radius}
            widthSegments={10}
            heightSegments={7}
             style={{
               transform: [
                   {translate: [0, -1, -3]},
                   {rotateX: 45},
                   {rotateY: 90},
                   {rotateZ: 90},

                 ]
             }}
             texture={src=asset('soMetal.jpeg')}
         />
      </View>
    )
  }
};

    AppRegistry.registerComponent('Basics',() => Basics);
We will add an alien image (wrapped in VrButton tags) to our project. On click, the alien will talk.
We have to import VrButton and Image components
import { AppRegistry, asset, Pano, View, Sphere, VrButton, Image } from 'react-vr';
➼ VrButton
➼ Image
Next, we will add a VrButton component to the view.
<View>
  <Pano source={asset('space-sky.jpg')}></Pano>
  <VrButton>
   </VrButton>
   ...
</View>
➼ VrButton
Now let's style our VrButton
    <VrButton
      style={{
        transform: [
            {translate: [0, 2, -5]},
            {rotateX: 45},
          ]
      }}
    ></VrButton>
➼ style -
Code to format the button's apperance.
➼ transform -
Code describing the button's position (see transforms)
Inside our VrButton tags, we will add an image component. I used the alien dude below. I named him alien1.png and saved him in the static assets directory.
Download Alien Dude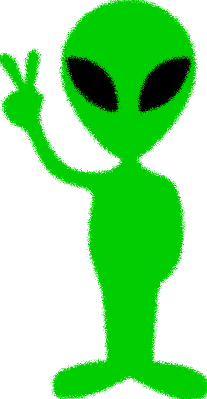
<VrButton
  style={{
    transform: [
        {translate: [0, 2, -5]},
        {rotateX: 45},
      ]
  }}>
    <Image
       style={{width:1, height:1}}
       source={asset('alien1.png')}>
     </Image>
  </VrButton>
➼ Image -
Code for our image component
➼ style -
format our image's apperance
➼ source -
Specify the location of our image.
I found a suitable alien voice on YouTube. YouTube provides a librbary of free downloadable sounds. I saved my sound as alien_voice.mp3 in the static-assets directory.
I want my alien dude to play the sound file on click.
➼ sound -
alien_voice.mp3 will play on click
<VrButton
  onClickSound={{
   mp3: asset('alien_voice.mp3'),
 }}
  style={{
    transform: [
        {translate: [0, 2, -5]},
        {rotateX: 45},
      ]
  }}>
    <Image style={{width:1, height:1}}
      source={asset('alien1.png')}>
    </Image>
</VrButton>
Here is a video of my application:
import React, { Component } from 'react';

import { AppRegistry, asset, Pano, View, Sphere, VrButton, Image } from 'react-vr';

export default class Basics extends Component {
  // constructor
  constructor() {
    super();
    this.state = {
        radius: .5
  		};
 }

  render() {

    return (
      <View>
        <Pano source={asset('space-sky.jpg')}></Pano>
        <VrButton
          onClickSound={{
           mp3: asset('alien_voice.mp3'),
          }}
          style={{
            transform: [
                {translate: [0, 2, -5]},
                {rotateX: 45},
              ]
          }}>
            <Image style={{width:1, height:1}}
                source={asset('alien1.png')}>
              </Image>
        </VrButton>
          <Sphere
            onEnter={() => this.setState({radius: 1})}
            onExit={() => this.setState({radius: .5})}
            radius={this.state.radius}
            widthSegments={10}
            heightSegments={7}
             style={{
               transform: [
                   {translate: [0, -1, -3]},
                   {rotateX: 45},
                   {rotateY: 90},
                   {rotateZ: 90},
                 ]
             }}
             texture={src=asset('soMetal.jpeg')}
         />
       </View>
    )
  }
};

AppRegistry.registerComponent('Basics',() => Basics);