In this lesson we will learn about state.
Everything I know about Virtual Reality programming, I learned from Praveen, BocaJS and Google!
Again, in our index file, we will start with the code below.
import React, { Component } from 'react';

import { AppRegistry, asset, Pano, View} from 'react-vr';

export default class Basics extends Component {

 	render() {
		return (
                      <View>
                        <Pano source={asset('space-sky.jpg')}></Pano>
                      </View>
		)
	}
};

AppRegistry.registerComponent('Basics',() => Basics);
React uses objects called props and state.
If the attribute of a component will change, that attribute will be part of the component's state.
If the component's attributes stay the same, it will be a prop.
JavaScript objects store defined functions called methods.
this is a keyword in JavaScript. What this refers to, depends on the way it is used. this will refer to the object to which the code belongs. In a constructor, this will refer to the newly created object.
Often we want to create an object type, to create multiple cases of the same object. To do so, we will use a constructor.
Now let's practice using state! We will build an app that displays a spaceship and a blinking greeting.
I decided to make a shape ship out of a sphere.
<Sphere
 radius={0.5}
 widthSegments={10}
 heightSegments={7}
  style={{
    transform: [
        {translate: [0, -1, -3]},
        {rotateX: 45},
        {rotateY: 90},
        {rotateZ: 90},
        {scale : .75},
      ]
  }}
  texture={src=asset('soMetal.jpeg')}
/>
To initialize our state variable, we will add it to our constructor. Our constructor is inside the root component.
export default class Basics extends Component {
  constructor() {
		super();

		this.state = {};
	}
  ...
  }
};
➼ constructor -
Here is our constructor code
➼ super -
When you have a constructor, you will call super(). It must be called prior to using this.
➼ this.state -
Initialize state
Now, we will make a boolean variable called showMe.
constructor() {
  super();
  this.state = {
		showMe: true
};
➼ showMe -
initalized at true
Next, we will create our greeting variable. It will be placed in our render function.
render() {
// Greeting Variable
let greeting = this.state.showMe === true ? 'Greetings Human!' : '';
...
Next, we will add a formatted Text component to the view. This is where the greeting will display.
     <View>
       // Panoramic Image
       <Pano source={asset('space-sky.jpg')}></Pano>
       // Greeting Display
       <Text style={{fontSize: 0.5, color: 'black', transform:[{translate: [0, 0, -4]}]}}>{greeting}</Text>
     ...
     <View>
Now, we will call the setIntraval Function. This is done inside the constructor.
// constructor
constructor() {
 super();
 this.state = {
    showMe: true
  };
  setInterval(() => this.setState({showMe: !this.state.showMe}), 1000);
}
➼ setInterval() -
State will change (show/hide) every second, causing the greeting to blink.
You should see something like this:
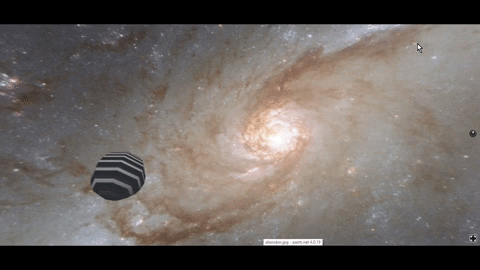
import React, { Component } from 'react';

import { AppRegistry, asset, Pano, View, Sphere, Text } from 'react-vr';


export default class Basics extends Component {
  // constructor
  constructor() {
    super();
    // state
    this.state = {
        // will the greeting show? (true/false)
  			showMe: true
  		};
      // Greeting will show/hide every second.
      setInterval(() => this.setState({showMe: !this.state.showMe}), 1000);
 }

  render() {
  // Greeting variable
  let greeting = this.state.showMe === true ? 'Greetings Human!' : '';
    return (
      // View
      <View>
        // Panogramic Image
        <Pano source={asset('space-sky.jpg')}></Pano>
        // Text Component: Greeting displays here
        <Text style={{fontSize: 0.5, color: 'black', transform:[{translate: [0, 0, -4]}]}}>{greeting}
          // My sphere spaceship
          <Sphere
          radius={0.5}
          widthSegments={10}
          heightSegments={7}
           style={{
             transform: [
                 {translate: [0, -1, -3]},
                 {rotateX: 45},
                 {rotateY: 90},
                 {rotateZ: 90},
                 {scale : .75},
               ]
           }}
           texture={src=asset('soMetal.jpeg')}
         />
      </View>
    )
  }
};

AppRegistry.registerComponent('Basics',() => Basics);